In this post I describe an automated way to import images from your iPhone and iPad to your Mac without using iPhoto or Photo Stream. Instead I use the system utility AutoImporter and Hazel, a $30 app.
Introduction
As nice as the iPhone and iPad are to make photos, it is rather difficult to archive them properly. Photo Stream is nice to quickly transport a picture from your iPhone to your iPad or vice versa, but I wouldn’t rely on it as an archive. It may or may not function as an archive, I don’t know. And that is exactly the point: if I don’t understand how it works then I don’t trust it. The same is more or less the case for iPhoto. It is also a black box for pictures. Some are imported. Some are not. Others seem lost. The end of the Christmas holidays and the purchase of a new computer seemed the right moment to finally delve into the problem: how do I safely store my photos?
The workflow
The goal is to move the photos from my mobile devices to a subfolder of ~/Pictures/JPG/. The subfolder contains the year and “iDevice” (i.e. 2015_iDevice). This is to fit with the way I store the photos from my DSLR.
The best way would be if I could do it over the air using Photo Stream. However, it seems that you first need to start iPhoto before Photo Stream updates. Not really an option for me. Instead I ended up using ImageCapture and AutoImporter (two system utilities) and Hazel (“Automated Organization for your Mac”, a $30 app).
ImageCapture automatically starts when you connect a camera/iPhone/iPad to your Mac (or use Spotlight or something). By default it wants to open iPhoto but you can also select AutoImporter. This starts an obscure utility that does what you think it does: it imports photos automatically to a specified directory — nothing more, nothing less. Finally I use Hazel to copy the photos to a subfolder in my JPG-directory.
Important note for people who restore their devices regularly.
ImageCapture
- Open ImageCapture (/Applications/Image Capture.app).
- Connect your device.
- At “Connecting this iPhone opens”, select AutoImporter.app.
- I leave “Delete after import” deselected. The workflow will not duplicate photos.
You have to repeat those steps for every device you have.

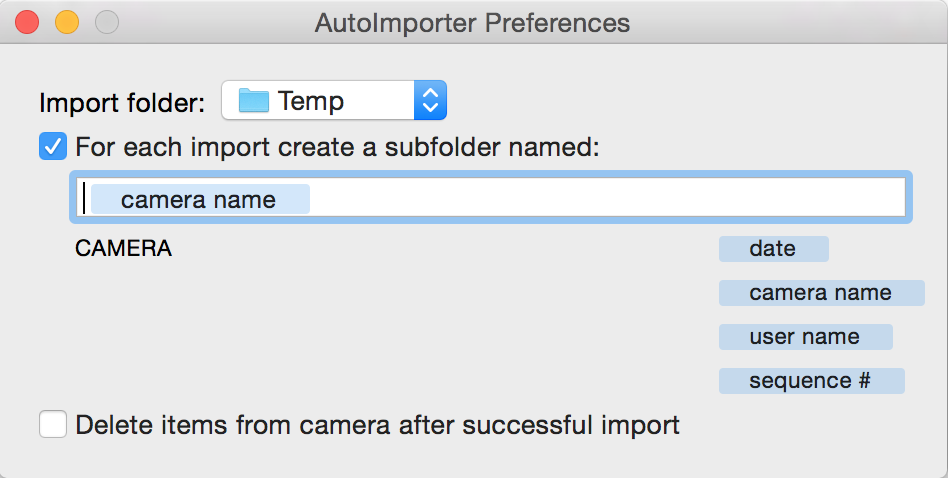
AutoImporter
- Open AutoImporter (/System/Library/Image Capture/Support/Application/AutoImporter.app). Spotlight will not find it.
- Go to Preferences. If the app is not used for some time OS X will kill it, so do this quickly-ish.
- Specify a folder for intermediate storage. By default it creates a folder “AutoImport” in ~/Pictures, but I don’t like that. You can delete the folder afterwards, but it means more work when the device is connected the next time. I used ~/Temp.
- I import the files to a subfolder that specifies the camera name (it uses the name you gave the device, in my case that is RBiPh5). You should do this when you have more than one device, as the iPhone and iPad use the same format for the filename and there may be confusion.
From now on, every time you connect an iPhone the photos will be imported to ~/Temp/RBiPh5/. For the iPad this is ~/Temp/RBiPa5/.
Hazel
The files are put in the JPG folder by Hazel. First, in the left pane, select the intermediate folder (i.e. ~/Temp/RBiPh5/). If it doesn’t exist yet, create it manually in order to make the rule.

Then set up a new rule as shown below.
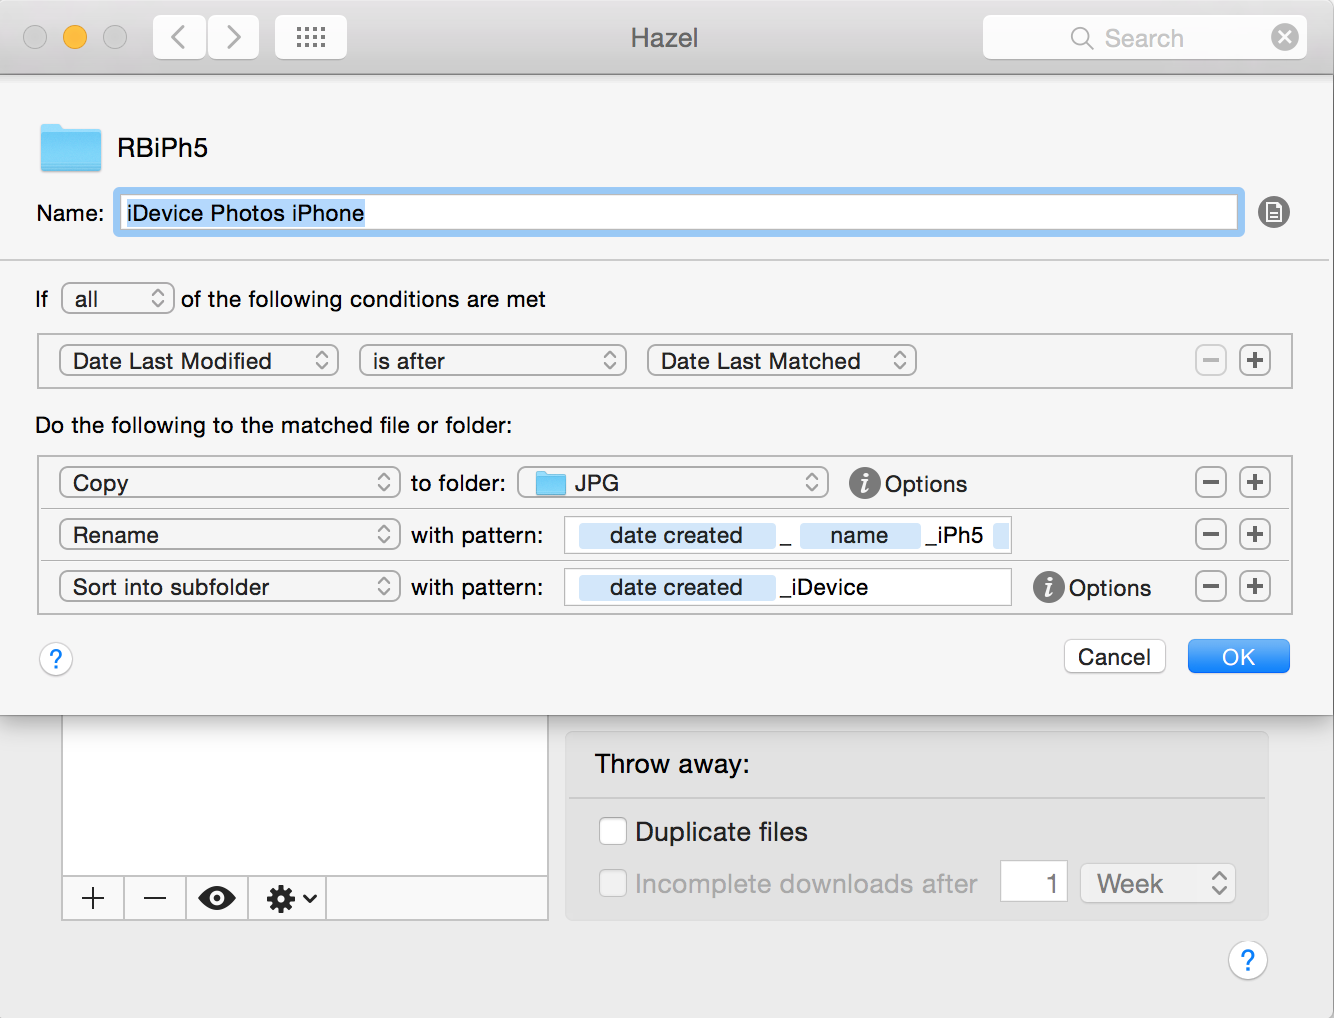
- We only want to look at the files that have been modified after the last time we ran this rule.
- We first copy them to the folder JPG. This is an intermediate step. At the “i” I selected that duplicates will not be copied.
- Then the photo is renamed.
- The image numbering on iPhones and iPads is not synchronised. To make sure IMG_0002.JPG shot in January is shown before IMG_0001.JPG which was shot in February, I prefix the date.
- Both an iPhone and iPad may make the photo IMG_0001.JPG on the same day. To prevent conflicts I also add the device name (iPh5/iPa5) to the filename.
- Finally, I sort the file into a subfolder, with the year as prefix. At the “i” I selected that duplicates will be thrown away.
You’ll need to make separate rules for different devices, since they have different source folders. Better: set it up for one device, then copy it and modify it.
The order of operations in Hazel is important. If you rename the photos while they are in the intermediate folder AutoImporter will re-import the files. If you rename them after they are sorted into the subfolder duplicates are not recognised.
What happens…
…when I connect the device it for the first time?
AutoImporter will copy all files to the intermediate directory (and make it if it doesn’t exist). Hazel will copy the files to the folder JPG and then sort them into folders for the year. If the year-folder doesn’t exist yet Hazel will make it for you.
…when I connect the device subsequently?
AutoImporter will copy new photos to the intermediate folder with the photos on the device. If photos have been deleted from the intermediate folder they are copied as well. If photos are deleted on the device they will not be deleted from the intermediate directory.
…when I restore my device and the photos start numbering at 0001 again? (important!)
I didn’t test it, but the new photos will probably be thrown away. You can prevent this by changing the device name in Hazel (from iPh5 to iPh5b or so).
…when I delete the intermediate folder and then connect the device again?
AutoImporter will create the missing intermediate folder and then import all photos again. Hazel will either recognise that it already ran the rule for the photos that have been deleted (it has a memory). If it doesn’t, the duplicates will be thrown away at the “sort into subfolder” step.
It is not a problem when you delete the intermediate folder, but Hazel will copy and rename all files again, only to throw them away later. If there is no reason to delete it, keep it.
…when I manually move or rename photos in the final directory?
You can manually move and rename the photos. Hazel shouldn’t try to copy, rename and sort the photos again (they have already been matched). However:
- When you delete the intermediate folder and Hazel doesn’t recognise that the photos have already been matched you will end up with differently named duplicates.
- When you rename files use a name that won’t conflict with future photos. Otherwise Hazel will throw away the new photos.
…when I rename my device?
AutoImporter will make a new intermediate folder and import the photos to that. Since Hazel won’t look there they will not be copied to the JPG folder.
Conclusions
I’m really happy with the workflow. In most cases I have the feeling that making the workflow costs more time than you’ll ever save by using it. With this workflow I know my photos are safe. This peace of mind is worth the effort. (I probably spent more time writing this blog post than making the workflow).
It is a pity that it doesn’t work over-the-air. The weak link is that I’ll need to connect my iPhone/iPad every now and then. I don’t do this very often, but often enough to be okay with it. I don’t know how this works with iPhoto. Could it be that you needed to connect your iPhone AND start iPhoto? In that case this workflow is clearly a step forward.
Finally, I’m wondering if you could use Automator instead of Hazel. Hazel is more flexible, especially regarding sorting into subfolders with a year in front of them. Maybe AppleScript can help… If you care more about $30 than subfolders then Automator will probably work fine.